Showing posts with label Matchboxes. Show all posts

Sunday, 11 October 2015

Matchbox Skeleton Shack

I'm running a swap over on UKScrappers at the moment to mak a little Halloween matchbox of horrors because )a) there are no other Halloween swaps on there and (b) I do love me a good matchbox.

The swap is to decorate a matchbox and make a little book to fit inside it. I may (ahem) have gone a little overboard this time as here is what I've ended up with. I was aiming for the look of an old abandoned haunted shack, and although I'm not too sure about my attempts at cobwebs I'm happy with the overall result.


There are three medium sized matchboxes glue together to make the house as you can see below. All covered with hand cut and inked paper to look like old weatherboard.  I used one of those plastic rulers with an image that appears to move as you move the ruler (sorry, I have no idea what the name for them is) to line the matchboxes. The ruler has marching skeletons on it which,, if you take the little books out can just be seen through the windows of the shack (hence skeleton shack).


The roof is made with a straw chimney and two smaller matchboxes inside - these hold little Halloween tickets that came from here and here which I resized to fit.


Inside each f the larger matchboxes are some little books that I made, and I will leave it for the recipient to find out what's inside.


I hope my swap partner likes it and thanks for looking.


Thursday, 30 July 2015

Not so weird ...

Now I know that we here at the weird scissors usually like to bring you something a little different. This project - well not so much - but I'm pleased with how it turned out.

I do love me a matchbox so I couldn't resist the mini matchbox swap set up by the lovely Sian. My partner wanted art journal prompts and, after going round the houses somewhat, I got there in the end even if I did make not one but three matchboxes.

So, here they are ...


A little glimpse of what's inside ...


This is the first one I made by cutting up some magazines, a few stamped images and a lot of ink. It's basically a collection of mini art journal pages. Not really prompts, more inspiration perhaps, so time to do another one.


This probably fits the brief the best, although it's actually the last one I did. Lots of inky, painty, stencilled and stamped backgrounds with a some prompts and a bit of washi tape thrown in for good measure. There are over 30 cards to keep my partner going for a while.


And finally a little bonus box. I went completely off piste with this one after I had some success making faux leather out of paper. It came out really well, although I was just experimenting and have not been able to recreate the results since! Anyway, I used the faux leather as the cover for a little mini journal. It's the first time I've actually done proper sewn in signatures but it won't be the last.


The book is just a collection of papers, many from vintage books and maps, with bits and bobs added here and there, plus some more quotes paper clipped in that can be used in the book or for further inspiration.

I hope my partner likes it. I've had a lot of fun so I may just make some more for myself.

Have a good one and thanks for looking.

Bex

Friday, 28 November 2014

Matchbox Keepsake and a Festive Friday Giveaway

And we're back after our little break with some news. We are now on the design team over at the Left of Center Challenge Blog so we'll be popping by every Friday with something new for them, as well as some of our one off projects. See the end of this post for our new Festive Friday Giveaway.

The first project is a matchbox keepsake box. Now I love my matchboxes and alter them all the time. If someone knows a good use for like a gazillion matches please let me know! Anyway, here's what I did with four of them and an image from A Day For Daisies.

 Looks like a plain old card from the front.


But it's actually a keepsake box that could be filled with treasures.


Really simple to make. Take four matchboxes and line them up like this.


Measure two pieces of card a little bigger than the boxes and glue them to the top and bottom.


Cover the sides of the matchboxes and the front of what will be the drawers with card and add brads to the drawers to act as handles.


Finally, line the drawers and add your chosen decoration to the front, and you're done.


A quick and simple project for these busy times and it would make a nice alternative to Christmas or birthday cards, with the drawers filled with little chocolates pr other little gifts.

I am giving this away to one winner - just leave a comment here or on our facebook group before midnight GMT on Wednesday 3 December  and I will pick a winner at random and send them this box. I made even add a few goodies to the drawers. Winner will be announced next Friday so good luck.

I'm entering this into the following:
Artistic Inspirations Challenge for warm and cozy/anything goes

Cheers for now and see you soon.

Bex

Sunday, 2 November 2014

2. Dia de los Muertos Part Three and giveaway winners

Love the memory quilt Lou and a great tutorial on making tissue paper fabric. I still have some left after my project here so I will be having a go at that.

Firstly, the Wicked Wednesday giveaway winners of the canvas/card/pendant sets are:

Pauline Davidson (from facebook)
Donna (Snarky Stampers)

I will be in touch shortly for address details.

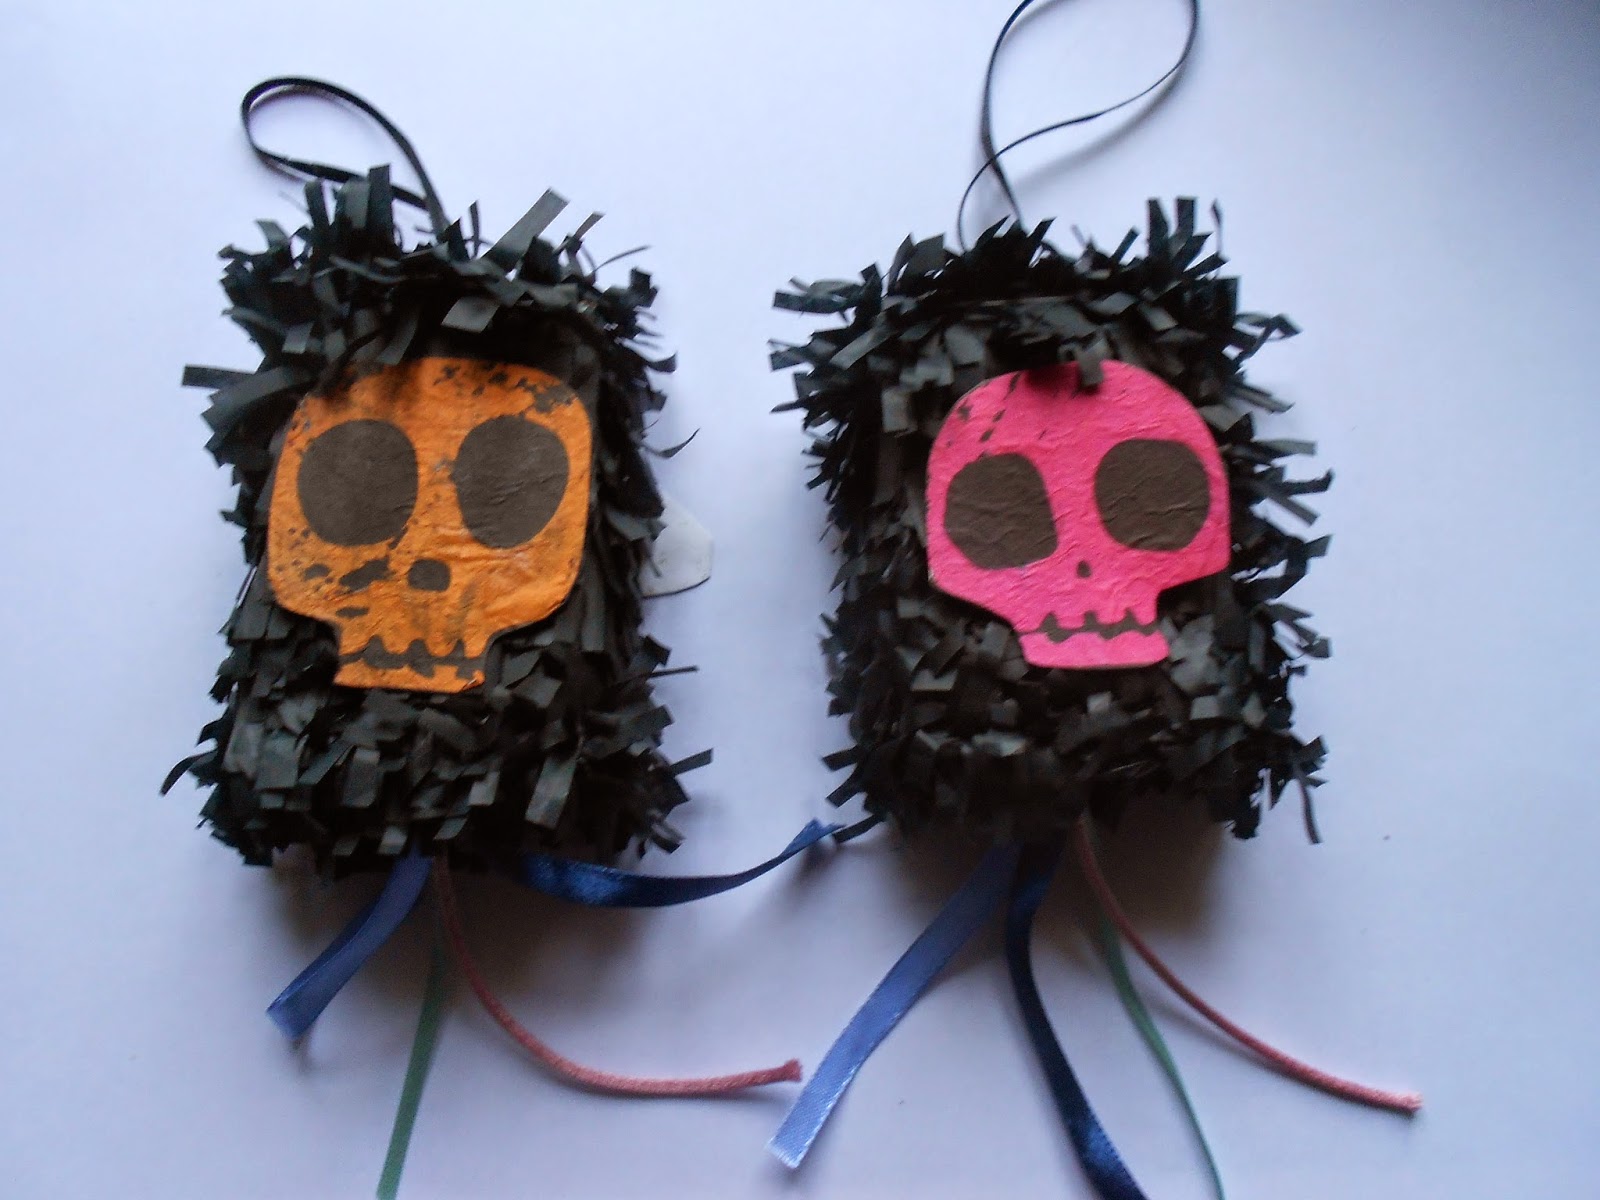
Now, my final project before we have a little break - mini matchbox pinatas. Remember the mini matchbox monsters I made? Well, I still had some matchboxes left and I love pinatas (and always have them whenever we have a party) so I thought that some mini ones would be fun.


Now, these are just the matchboxes, covered in fringed tissue paper at the top and sides.

I wasn't sure what to do to decorate them, so I looked to my shower curtains for inspiration. Yes, I have Mexican Folk Art shower curtains like these!


I did my own interpretation of the couple in Posca and Sakura gelly roll pens. I wanted them to look a bit naive so they are deliberately rough. That's my excuse anyway.

Next thing to do was to poke a hole in the centre of both the top and bottom of the inner box. I threaded one loop of ribbon through the top and knotted it on the inside, and a few different ribbons at the bottom, again knotted on the inside of the box. Fill the box with little sweeties and then just pull on the bottom ribbons to open them up.


Fun as little table decorations just as they are. However, if you want to hang them up and make them open more like real pinatas, cut the inner box in the bottom two corners as shown below, then use some sticky tape to stick the box back together,


Hang them up and pull the ribbons at the bottom. As the bottom is now weaker than the top, the taped flap should open up spilling the sweeties out of the bottom. You could of course just bash them with a stick too I guess!


There are other ways to decorate them too. Here, I used some skulls cut from a napkin.


The other thing to do is the classic sugar skull. Here, I used this picture drawn by my super talented daughter Alex (thanks Alex), scanned and reduced in size on some white pinatas. Loads of possibilities so have a go.


Finally, a big thanks to everyone who has worked to make this blog happen, both the lovely contributors and the equally lovely people who have taken the time to read and comment here. It's been a lot of work but huge fun.

I have entered this into the Left of Center challenge because, well I can!

We will be back after a little break with some Christmas crafting on the dark side.

Thank you all.

Bex

Wednesday, 8 October 2014

8. Mini Matchbox Journals - and a GIVEAWAY!

Details of the giveaway are at the end of this post.

A fun mini project - little matchbox Halloween journals. Perfect for using up those scraps of paper. A big thanks you to Gill who made some mini journals for a swap that I ran recently, and who inspired me to make spookier versions.


Remember those little matchbox monsters I made HERE. Well, I wanted something to fill the matchboxes with. Of course, I could have filled them with sweeties, but then I’d have just eaten them! 

Instead, I cut 31 rectangles of watercolur paper and leftover scrapbook paper a little smaller than the inside of the matchboxes.  I then punched holes in the top left corner of each one with my cropodile and inked around the edges. 

For the covers, I used greyboard from the back of old paper packs, and decorated them in a variety of ways. Ready made embellishments, inked embossed images, stamps, googly eyes, and my version of the journal covers that Lou made HERE (thanks Lou). Having punched the holes the same as for the pages, I set eyelets into the covers for a bit of extra sturdiness.


To make the closure,  you need something elastic - a narrow hair tie is ideal and was just the right size. I love it when a plan comes together! Punch an additional hole in the lower middle of the back cover and push your hair tie/elastic through that hole and then set with an eyelet which should hold it in place. Trim any stray elastic at the back.


I added a small book ring through all the holes and some little charms and 'tis done!


And they fit perfectly in the matchboxes.


I have entered this into the Corrosive Challenges blog.

I am giving away six of these matchbox monsters, complete with mini journals inside. All you have to do is leave a comment on ANY post by midnight (GMT) Friday 10 October and six lucky winners will be announced on my next post on Saturday 11 October, so check back than to see if you have won.  I will happily post to anywhere in the world. If you have already left a comment, then I thank you for taking the time and you are already included. Good luck.

Bex

Thursday, 2 October 2014

2. Matchbox Monsters

Thanks Lou for yesterday's fabulous post. I will be having a go at one of those pendants just as soon as the eyes hit the shops.

A really simple little project from me today - little matchbox monsters.


For this project you will need
  • some matchboxes (obviously!) Mine were 5.5cm wide, 8cm tall and 3.25cm deep
  • some paper to wrap around the matchboxes (I used some old Halloween scrapbook paper)
  • images of your choice, approximately 1.5 x height of matchboxes
  • glue
  • ink pad
  • marker or Posca pen (optional)
  • Glossy Accents (optional)
I used Octopode images from some of the collage sheets available here as their bright and colourful style went well with my papers. Being digital images they were super easy to resize to fit my matchboxes. Stamped images would work well too.

Wrap your chosen paper around the outside of your matchbox and glue, then ink around the edges. Also, use some of the paper to line the inside of the matchboxes and adhere. Then, take two identical images and cut around them.  Place the first one centrally in the inside of the matchbox. As your images are larger than the box you will have to cut it to size by chopping off the head! Place the outside back one, leaving it about two thirds open. You can then line up the top part of your image with the inside part so that went the box is open you have a complete image as you can see below.


To finish off, colour with marker or Posca pen those parts of the matchbox not covered with paper. You don't want to use anything too rough as it will stop the slide action of the box. Finally, I added a little glossy accents to the eyes to highlight them.


These matchboxes make great little holders for some mini journals that I will be showing later in the month.  Fab filled with sweets to use as little Trick or Treat boxes or just stand alone little decorations. You can also play with them by mismatching the heads and bodies. I hope you have some fun with these, and see you tomorrow for Jas's project.

I've entered this is in the A Step in the Darkness challenge blog here, The Corrosive Challenge here and Divas by Design here.

Bex