Showing posts with label decorations. Show all posts

Sunday, 7 December 2014

Skullflakes

Good Morning peeps. Today we have some sparkly skull flakes!!  Skull flakes I hear you say, that must be a typo Lou, surely?  Well folks, this is the Weird Scissors after all!!


1. Prep: Using a chocolate mould and air dry clay make up lots of skulls.  I usually make the skulls at least 1 week ahead of time, they can take ages to dry.


2. Cut out lots of snowflakes (Sizzix die) from mountboard, it has to be sturdy enough to take the weight of the skulls.

3. Paint the skulls and the snowflakes with white gesso and pale lilac paint, when dry slap on some sparkle.


4. Make a small hole in one of the 'arms' of a flake and attach a jump ring for hanging.

5. Using a hot glue gun, attach the skulls to the snowflakes.

6. Glue gems into the eye sockets.  

7. When dry hang up and enjoy.


I wonder what my guests will think of these or if they will even notice!

Fancy some skulls to play with? 

I am entering this into the Corrosive Challenge Blog for anything goes.
This is entered into the Altered Eclectics Challenge for the countdown to Christmas.


I'll randomly select 3 people who comment (on our blog or fb group) on this project. 
Deadline 17:00 Monday 8th December
TFL Lou x


Saturday, 6 December 2014

Eye Baubles

WOW what an awesome project, thanks for sharing Jas.

Introducing the EYE Baubles. (Yes, eyeballs rock!!)


1. Cut out lots of Christmas baubles (Sizzix Die) from mount board.  

2. I painted both sides with white gesso, then painted with an irridesent white paint. 
The hangers where painted with gesso and then several layers of gold paint.

3. Using a permanent red pen, scribble on the blood shot veins.

4. Using scraps of my hand made tissue fabric (instructions can be found HERE
and black card cut out circles and attach.

5. Decorate the eyes with glitter, well it is Christmas after all!!


Next step is to try and make 3D Eye Baubles.  I'll let you know
if I'm successful!!  

TFL Lou x


Sunday, 2 November 2014

2. Dia de los Muertos Part Three and giveaway winners

Love the memory quilt Lou and a great tutorial on making tissue paper fabric. I still have some left after my project here so I will be having a go at that.

Firstly, the Wicked Wednesday giveaway winners of the canvas/card/pendant sets are:

Pauline Davidson (from facebook)
Donna (Snarky Stampers)

I will be in touch shortly for address details.

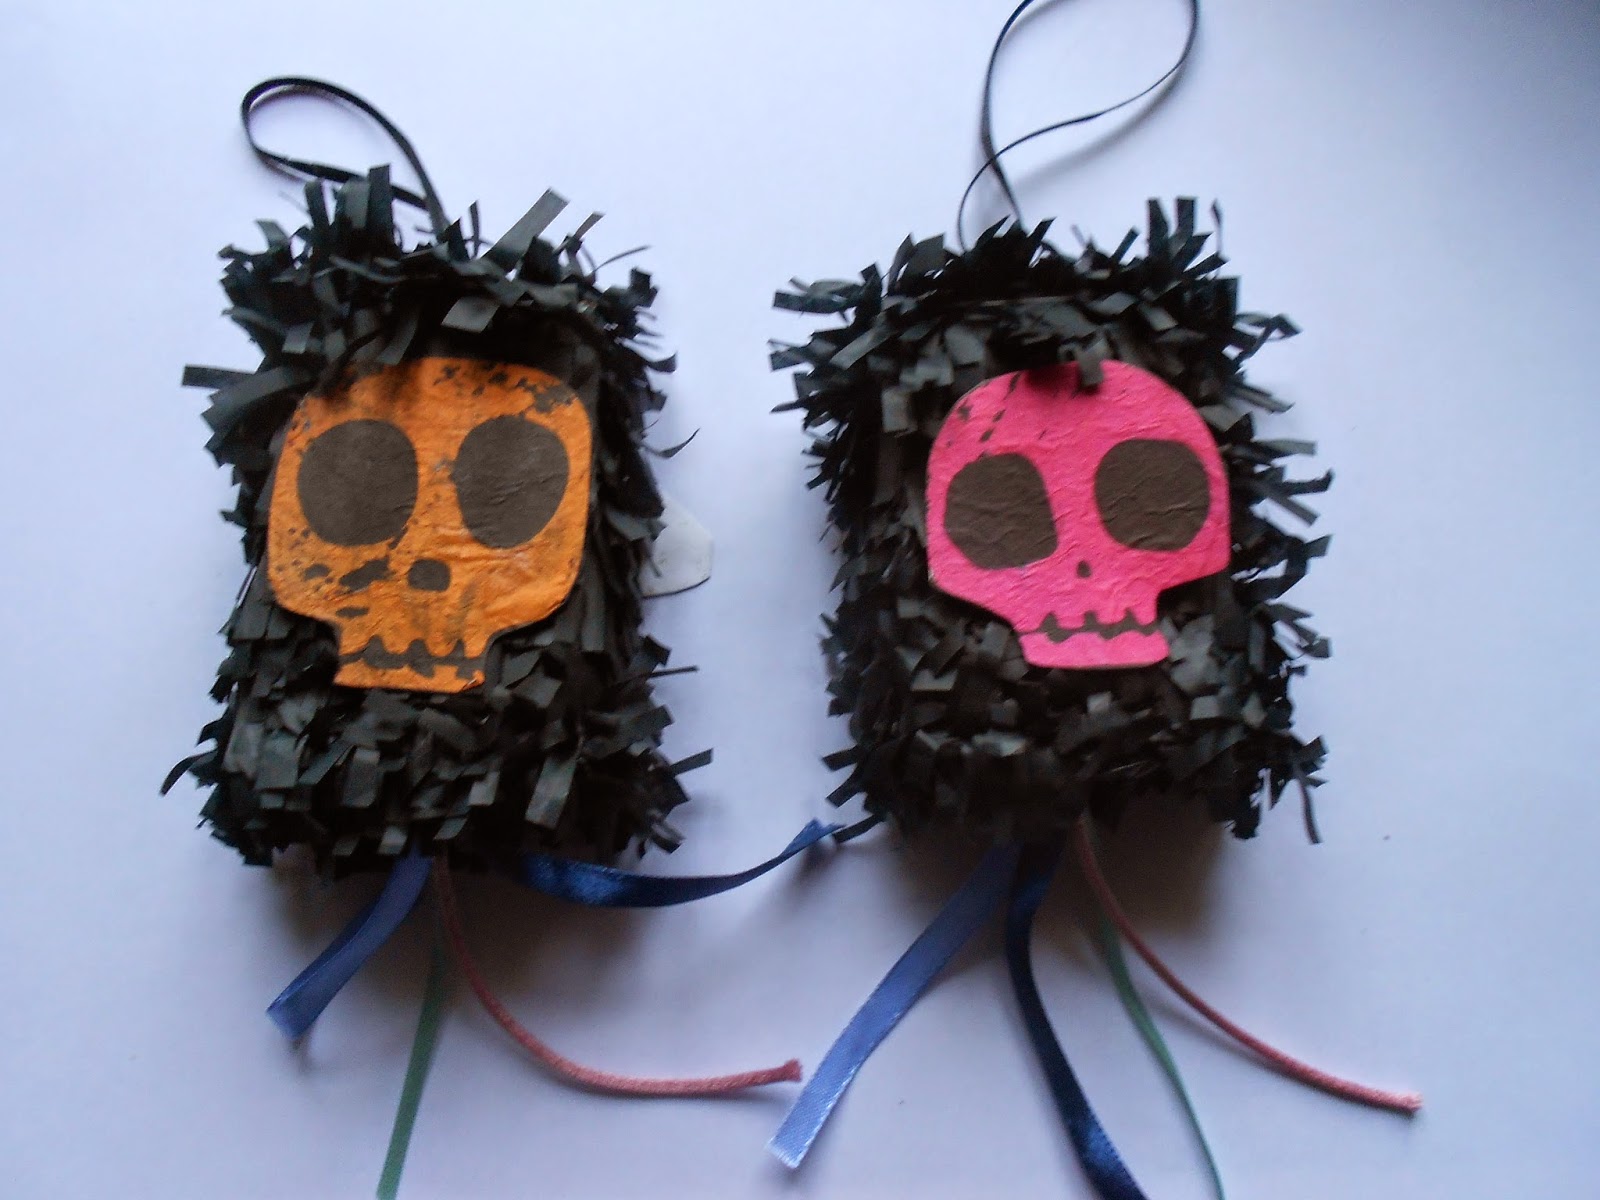
Now, my final project before we have a little break - mini matchbox pinatas. Remember the mini matchbox monsters I made? Well, I still had some matchboxes left and I love pinatas (and always have them whenever we have a party) so I thought that some mini ones would be fun.


Now, these are just the matchboxes, covered in fringed tissue paper at the top and sides.

I wasn't sure what to do to decorate them, so I looked to my shower curtains for inspiration. Yes, I have Mexican Folk Art shower curtains like these!


I did my own interpretation of the couple in Posca and Sakura gelly roll pens. I wanted them to look a bit naive so they are deliberately rough. That's my excuse anyway.

Next thing to do was to poke a hole in the centre of both the top and bottom of the inner box. I threaded one loop of ribbon through the top and knotted it on the inside, and a few different ribbons at the bottom, again knotted on the inside of the box. Fill the box with little sweeties and then just pull on the bottom ribbons to open them up.


Fun as little table decorations just as they are. However, if you want to hang them up and make them open more like real pinatas, cut the inner box in the bottom two corners as shown below, then use some sticky tape to stick the box back together,


Hang them up and pull the ribbons at the bottom. As the bottom is now weaker than the top, the taped flap should open up spilling the sweeties out of the bottom. You could of course just bash them with a stick too I guess!


There are other ways to decorate them too. Here, I used some skulls cut from a napkin.


The other thing to do is the classic sugar skull. Here, I used this picture drawn by my super talented daughter Alex (thanks Alex), scanned and reduced in size on some white pinatas. Loads of possibilities so have a go.


Finally, a big thanks to everyone who has worked to make this blog happen, both the lovely contributors and the equally lovely people who have taken the time to read and comment here. It's been a lot of work but huge fun.

I have entered this into the Left of Center challenge because, well I can!

We will be back after a little break with some Christmas crafting on the dark side.

Thank you all.

Bex

Sunday, 26 October 2014

26. Don't Open The Door!

Wow Lou, a fantabulous project yesterday and one I will be making as it would go well with my offering for today.


Heard of fairy doors? Little doors that you place around your house, often next to the skirting, to let the fairies in. Phht - we want no butterflies and flowers and fairy dust coming in at this time of year. We want to welcome something scarier into our homes, right?

So, in the spirit of fairy doors, I present some Halloween doors.

First thing that came to mind was zombies. Of course, you probably don't want to let them in because they'll wreck your house and eat your brains right? So, I did a keep out door, using corrugated card as the base, the frame from a small shadowbox like the one I used for my Danse Macabre post, and faux planks of wood (see my witch's birdhouse post for details). A little gel pen for the nails, some printed zombie tape, a zombie picture behind the frame (mostly hidden) and some arms from the cheapest of cheap pound shop fake barbies, painted green, and bob's your uncle.

See, I told you not to throw away the dolls after you use the legs for Lou's project.


But why stop at zombies? Why not go horror as well? So next, I did a psycho door. Same corrugated card base, a bit of scrap sheer-ish fabric and some eyelets, glued onto the perspex from the shadow box frame for sturdiness. I slashed it a bit and added some alcohol ink for the blood. I also pooled some glossy accents at the bottom, coloured with the same red alcohol ink, and when it dried you have a nice pool of blood emerging from underneath the shower curtain which I accented with a knife photo. Not sure it's the sort of home decor that Janet Leigh would like, but it's going in my bathroom.


A door doesn't have to be just door shaped though. I recently received, via a swap, a coffin cut from chipboard and a skeleton that fit's beautifully inside. Plenty of templates out there on the net. I covered the coffin with paper and added an RIP charm I had. Did you know, if you add a splot of glossy accents and then smear it all over with the side of your finger, you get a passable polished coffin wood effect? Well, you do now.


I added some red crystals to my skeleton's eyes, and then you can leave the door somewhere either closed of half open to make it easier. I imagine skeletons, having not much in the way of  muscle tone, might appreciate the extra help.


And finally, arachnophobes look away now! It's going to get worse!!


I wanted to use the last bit of the shadow box, seeing as I had now used the other bits and couldn't really get a refund any more! So, I lined the base with paper with webs stamped over it, and filled it with a couple of fake plastic spiders and that fake web stuff that you can get in the Halloween aisle at this time of year. I made a web from thin black wire and added another spider, so hopefully it has a bit of depth and looks like a spiders' lair. A door made from embossed and inked card completes the deal.


Just for fun I'm entering this into The Male Room Challenge  and the Left of Center Challenge blogs.

Well, that's it for me for today. Tune in to see another fab project tomorrow, and the next time I post will be for our last Wicked Wednesday giveaway.

Stay spooky.

Bex

Saturday, 25 October 2014

25 Learner!

While browsing around the web, as we do, I stumbled across THIS full sized project of a Glam Witch Crashed into a door.  Using the instructions given I miniaturised the project.


Material Used

1. Chipboard decorated as a brick wall
2. 2 Plastic cups, covered in like green tissue paper and a cross cut into the base so the broom handle can poke through.
3. 2 Barbie doll legs, painted in gesso, then covered in strips of black tape
4. A small craft broom, I replaced the broom handlewith a longer bit of stick
5. 2 rectangles of tissue paper stitched and gasthered at one end; this is the bloomers
6. Using the shoes which came with the doll, I painted them with black gesso and covered in purple glitter.
7. Lots of black tissue for the skirt.
8. Lots of hot glue for securing everything.


Its then just an assembly job with lots of hot glue to attach the witch to the brick wall.


I did add in an "L" plate!!

I have entered this into the PDE Linky Party for Halloween decorations and the lovely Left of Centre Challenge Blog.

Hope you enjoyed my miniaturising project.
Pop by tomorrow and see what Bex has been up to!!


Saturday, 11 October 2014

11. Grow Your Own Zombie


Oh yes, it's Zombie Time! Who doesn't love zombies? Well, now you can (sort of) grow your own little pot zombies.


You will need

A polystyrene hand
Acrylic gel medium/Mod Podge
Black tissue paper
2/3 different green paints
Flesh coloured paint (I used a Posca pen)
Black and red paint pens or markers (again, I used Posca pens)
Crackle Accents
A plant pot (mine was 12cm diameter)
Graveyard silhouette cut out (mine was a Quickutz border cut from black card, optional)

Take your polystyrene hand and cover it with acrylic gel medium (or Mod Podge), and scrunched up black tissue paper. Be sure to make the tissue paper nice and wrinkly, and add a few lumps and bumps too. Cover the tissue paper with another layer of gel medium and leave to dry. Now, go and wash all the black off your fingers! When dry, cover with a mix of two or three suitably zombie green paints and leave to dry.


You can see that I missed some bits so some of the black shows through - this is fine. Note the lumpy bits too.


Once the green is dry, lightly go over some parts with the flesh colour. Don't cover the green, it's more like giving a hint of decomposing flesh!

Add some wounds, especially over those lumps and bumps. by adding a small splodge of red and then roughly outlining in black. Immediately add crackle accents just to the wounds - this will make the red and black run into each other. Leave to dry for longer than you think. You should end up with something that looks a little like this. Note to self - do not put it in the soil before taking the photo, otherwise bits of soil will get everywhere!


Now, because the hand is polystyrene, use your thumbnails to press into it where the knuckles would be, and also around the edge of the hand's nails to emphasis them. Outline the nails in black and again, add your crackle accents straight away and leave to dry.


One you're happy with the way your hand looks, all you need to do is place it in your plant pot and add a little potting soil around it.

I decorated my pot by painting it black and adding a graveyard border around the top, but you can leave it plain or decorate however you like. Et voila - grow your own zombie. It looks a little different here, but my camera loves to show off its flash, even in full daylight!


By the way, if you don't have house room for a full sized zombie plant, you could make a mini one with a doll's hand (bye bye Barbie!) and a mini plant pot.

I have entered this in the Corrosive Challenge Blog for Halloween and the Altered Eclectics Challenge..

Have fun, and come back tomorrow for more from the lovely Jas.

Bex

P.S Winners of the giveaway for matchbox monsters are:

KarmaCraft
Jill
Sue Jones
Gill Parry
Amy Wood
Irene Boothroyd

Congratulations - email your address to rebecca.mclean@gmail.com and I will post to you as soon as possible.


Friday, 10 October 2014

10 Chalking up the Coffins

Loved yesterdays project from Jas and what a great giveaway from Rebecca.

Have you left a comment yet?  You've got to be in it to win it!!

Todays little project can be completed in under 1 hour once you have gathered all your supplies and it involves mixing up your own chalkboard paint.  Oh the possibilities!!

Supplies:
22cm x 11.5 cm thick chipboard or mountboard
5.5cm x 5cm thick chipboard
1 teaspoon Grout powder
8 teaspoons BLACK acrylic paint
102cm wire, I used thin garden wire
5 x Small bats, I cut mine with my sizzix die.
5 x Sticky Dots
5 x small circles.

Instructions: 


This is my template, I took a DL envelope folded it in half and eyeballed it!!  I have marked on the measurements if you want to follow it.


This is the coffin cut from chipboard,mine was a bit flimsy, I suggest you use a sturdier base.

To make your CHALKBOARD paint, MIX 1 part grout : 8 parts acrylic paint, you don't need very much hence my suggestion in the list to use teaspoons!!

Apply 2 coats of Chalkboard paint, allow the first coat to dry, it only takes a few minutes.


Next cut the wire into 6 x 17cm pieces.  Attach the bats to 5 of them, I used glue dots.


Next take the 5.5cm x 5cm piece of card, cover one side with double sided sticky tape, attach the bats on wire, bent as desired and using the last piece of wire, make a hanger.  I applied double sided sticky tape over the top to help secure the wire.

NOTE: The sticky tape side will face the front of the coffin.

Attach to the back of the coffin.


Rub chalk all over the coffin to 'season' it, wipe the chalk away, its now ready to use.

Enjoy!!


I have entered this into the Crafting by Designs Boo Challenge.

Rebecca is up again tomorrow, I wonder what devilish dark delights she has in store for us.

Thursday, 9 October 2014

9. Old book decorations

Say Halloween to me and instantly I conjure images of old gnarly faced hags bearing nice red juicy apples.  But buying red apples takes all the fun out of it plus what I do buy, I need for bobbing.  Instead get out the old book I warned you about earlier.


Now make sure if you're joining along, this isn't a special or first edition, it's not part of a set that you'll be able to sell or want to read again, and at this point I'm adding a disclaimer that it's your choice what book to use, it's not my fault :)

I've created all three of these out of a children's book about a cheer leading witch.

Now admittedly next time I do these I would make them slightly smaller, but my book was 5"width, so I went with that. I'd probably try cutting the outer margin off first, giving 3.5" or 4" max, as whatever size you start with will be slightly smaller than what you end up with, and these 5" books ended up huge.

Whatever size you decide - you need to remove the front cover and spine, leaving the glue attached, and count out 2 lots of 20 pages.


Next, square it off - fold the bottom corner up diagonally into the middle spine, giving you a square, draw your 'cut' line, unfold and cut all 40 pages. (I found by folding the pages up from the bottom you have less gaps for the chapter headings giving a nicer overall finish)


Fold each page in to the middle spine adding a tiny bit of glue to the underside as you go, this will help keep in any stray pages. 

Pick a design shape. 
You need to create a template no bigger than this half of the page, (with a 5" book your template should be no wider than 2.5) 
make sure that at least one point your design comes right to the folded edge 


As you can see above the cross lines are my waste around the cut line, but at the widest point I'm not cutting down the seam, this leaves the pages joined together, some will be accidentally cut which is why you need to glue each fold.


At around every 5 pages, slot in your template draw and cut round all 5 pages together, carry on going until complete.

Glue the 2 halves together to create a full shape.

Fluff the pages out to create a full standing circle.


Decorate with inks, pens and embossing powders: 
for the pumpkin I watered down some orange dylusions ink and painted on with a brush, around all the outside edges and one central face page, I drew out my pumpkin design and coloured the darker bits with a red pen, using Distress ink in black soot, I darkened the edges further.


The apple was inked in a similar way to the pumpkins, using highlighing glitter pen to create sheen around the edge and green pen with glitter for the surprise poison centre.

I have entered this into the Corrosive Challenge Blog for Halloween.

Hope you have as much fun as I did.

Jaz x